Sunday, September 15, 2013

Journal background using Vaseline Resist Technique

This is another journal background I completed for the mixed media resist challenge over the summer. I learned the technique of using Vaseline as a resist from Julie Fei Fan Balzer. You can watch her video demonstrating this technique here
Beware....This is a VERY messy technique, but you get a cool look on your project.


I started by covering my journal page in black gesso.

I then applied the Vaseline through my Donna Downey/Prima 12x12 Floral stencil. After I finished applying the Vaseline, I painted the page with some acrylic paint mixed with Liquitex glazing fluid. I used short strokes so the Vaseline wouldn't shift too much. Once the paint dried I wiped off the Vaseline with several TONS of baby wipes...once again, this is a very messy process! LOL
This is what you are left with! I love the look! I think I will have a hard time journaling on this page, its just to pretty :) I may have to try this on a canvas.
Thanks for looking! Have a great week friends!
Hugs!

Saturday, September 14, 2013

Water Colors and Black Glue Technique

While participating in a few mixed media challenges over the summer I created the art journal pages below. The challenge was to use watercolors and some black glue. I had never heard of this technique before and it intrigued me. I had fun playing with the black glue!
On this first page I created my circles with the black glue and let it dry. I then added the color with my Caran D'Ache NeoColor II crayons (Naples Yellow, Jade Green, and Turquoise). I activated them with water and let it dry. I then dropped some fluid acrylic inks in pink and blue and added the stamped words. 

On this page I put down the color first with my Reeves watercolor set. I then sketched out the tree with a pencil and then went back over it with the black glue. The inspiration for this came from a tree painting I saw on Pinterest. I tried and tried to find it again so I could link back to it, but sadly I could not find it again. If I ever come across it again I will come back and add the link....

Thanks for looking! Gentle Hugs!

Friday, September 13, 2013

Donna Downey Gel Medium Resist Technique

I recently participated in a mixed media challenge with a group of girls on Facebook. 
The challenge was to create a resist on your journal page and then paint it. I created this resist with Golden Gel Medium. After getting the gel medium on the page I embedded some leaves I found on vacation near the beautiful Truckee River into the gel medium. While that was drying I mixed some artist quality watercolor paint in Quinacridone Gold with Liquitex Glazing Fluid and painted it in the page. I let it sit for a couple of minutes then wiped off the paint with a baby wipe. The color remained in the nooks and crannies. I picked up this technique by watching a few TONS of Donna Downey Inspiration Wednesday videos! It worked beautifully! Now I have a gorgeous background for a art journal page! :)

Thanks for looking! Gentle Hugs!

Thursday, September 12, 2013

More Gelli Love!

Getting tired of Gelli Prints yet?!?!?! Not me! I may be late to the game, but better late than never! LOL
The next set of prints were done outside of my art journal to be used for various mixed media projects. The prints were made on some cheap card stock and a few on tissue paper.
Stencils used will be listed under the pics

This first print is one of my favorites! Looks like a sunset :)
Heidi Swapp Tiny Hearts and Sunshine stencils

Prima Donna Downey Poppies stencil
Balzer Design Mini Silhouette Script

(This print was done on white tissue paper)
Prima wood grain stencil
Heidi Swapp Sunshine stencil

The letters were made with an old alpha paper stencil set from my stash
Circle were cut from cereal boxes and used as masks

Feather was cut from my Cricut

Prima flourish mask
Prima hot air balloon mask

Prima splatter mask

Heidi Swapp Heart Cluster stencil


The letters were made with an old alpha paper stencil set from my stash
Prima splatter mask


Balzer Design Mix and Match Hearts
Heidi Swapp Tiny Hearts


Circles were cut from cereal boxes and used as a mask. This one makes me laugh because you can see from the gelli transfer what cereal box I used! LOL Can you spot it?!?!?

Thanks again for looking! Gentle Hugs!

Wednesday, September 11, 2013

Gelli Cards!

Hello again! 
While making several TONS of Gelli prints the other day I decided I should make a few cards on the Gelli Plate. Having extra cards with a background ready to go sounded like a good idea to me! Plus, it gave me a reason to play with the Gelli Plate a little longer :)
As always I will try to list the stencils used under the picture. 
If you have any questions please feel free to ask.

This first card I made into a thank you card for our teenage neighbor who watered my garden while we traveled this summer. It was enhanced with a black fine tip sharpie and a white gelly roll pen, splatters of Dylusion Inks and a thank you stamp from my stash.

Balzer Designs Mix and Match Hearts, Heidi Swapp Tiny Hearts

Inside of card

Heidi Swapp Tiny Hearts and Sunshine stencils
Prima Raindrops and Wood grain stencils
Balzer Designs Mini Stacked Triangles

Heidi Swapp Tiny Hearts and Sunshine stencils
Balzer Designs Mini Stacked Triangles
Prima Donna Downey Poppy stencil

Prima Donna Downey Floral stencil
Heidi Swapp Tiny Hearts

Prima Donna Downey Poppy stencil
Heidi Swapp Tiny Hearts 

Thanks for looking! Gentle Hugs!

Tuesday, September 10, 2013

Gelli Prints for my Art Journal!

Gelli, Gelli, Gelli! I have spent at least 12 hours playing with my Gelli Plate over the last three days! I love how every print is different and unique. Its almost impossible to duplicate a print twice! 
I thought I would share some of my favorite prints, but I will break it up into a few different blog posts since there were so many. 
This first post is all about the prints I created as backgrounds for my art journal. 
I first removed the pages from my Mixed Media Strathmore Visual Journal for ease of printing. This is one of my favorite journals to work in. The pages are 9x12 and the paper can handle anything I throw at it! The pages can accept layer after layer of different mediums without compromising its integrity. 
I used many different stencils for my prints from Crafters Workshop, Balzer Design, Prima, Heidi Swapp, and old stencils from my scrapbooking days. Stencils are definitely my favorite tool to use when playing with the Gelli Plate.
I also used many different types of paint from Sargent Arts, Amsterdam, and cheap craft paint. I have to say that my favorite paint to use on the Gelli Plate is the Amsterdam paint. It says wet for a decent amount of time and is thick enough that I can pull several prints from one application.
I will try to list the stencils used under the picture, but if you have any questions at all about what was used for a particular print PLEASE feel free to ask me! 
Hope you enjoy!

Balzer Designs Mini Silhouette Script, Heidi Swapp Tiny Hearts

Crafters Workshop Harlequin


Crafters Workshop Harlequin, Folk Art Pebbles


Prima Wood grain, Prima Raindrops

Prima/Donna Downey Floral


Heidi Swapp Heart Cluster, Prima Wood grain, Prima Raindrops, Heidi Swapp Sunshine

Balzer Designs Mini Silhouette Script, Heidi Swapp Heart Cluster


I have many many more stencils to try on the Gelli Plate, including several homemade ones. They are my favorite tool to use while creating with my Gelli Plate.....stay tuned!

Hope you enjoyed!Gentle Hugs!

Monday, September 9, 2013

Love me some peacock feathers!

I LOVE, LOVELOVE my Peacock Feather stencil by Balzer Design/Crafters Workshop! It's my go to stencil for all kinds of projects. I used the 12x12 stencil on this card.
I created this card for my mother in laws birthday.
Hope you like it!

 
To create the shimmery raised peacock feathers I mixed Liquitex Basics Iridescent Medium with Liquitex White Opaque Flakes Texture Gel and applied it though the stencil with a palette knife. It's hard to see on the photo, but it came out so beautiful! I absolutely love this look! 
After the feathers dried I applied the background color with Tim Holtz Distress Inks (Mowed Lawn, Tumbled Glass, Salty Ocean, and Seedless Preserves). 
 
(Closer look at the textured feathers and iridescent flakes!)
 
I finished off the card with some black mesh ribbon and the Oh Happy Day stamp by Stampology, Autumn Leaves set. 

Thanks for looking! Hugs!

Thursday, June 27, 2013

Currently....


Image by Saturated Canary, Enjoy the Rain
Colored with Neocolor II watercolor crayons


Loving - Lazy summer days! Sleeping in, swimming, hanging with the kiddos, watching the hummingbirds and dragonflies zip around the backyard.

Reading - How to Bake a Perfect Life by Barbara O'Neal, it's just an easy summer read :)

Eating - Angelcots, heavenly white apricots. I can't stop eating them!

Drinking - When I'm not drinking coffee....Passion Tea Lemonade, delish!

Anticipating - Family vacation! Can't wait to spend a few days with the whole family hanging out at the beach laughing and eating to much!

Listening - Jack Johnson, I Got You. I can't wait for the whole album to be released in September. 

Watching - Movies, tons of them! Thank goodness for Netflix and $5.00 movie days at our local theatre! Every Monday my daughter have "Classic Movie Monday" at home. Audrey Hepburn movies have been our favorite lately :)

Planning - Starting to think about holiday crafts! It's only a few months away! Yikes!

Creating - I haven't been creating a whole lot these days. I have just been spending my time coloring my favorite digi images. I have been enjoying my new Neocolor II watercolor crayons. At least I will have some colored digis ready when when I need them :)

Hoping - I'm hoping for another summer storm to pass through. We love swimming in the rain....

Image by Dilly Beans, Mermaid Framed
Colored with Neocolor II watercolor crayons


Thanks for stopping by! I'd love to hear what you are currently up to!
Hugs!


Sunday, June 9, 2013

Birthday 'Stache Bash!!


Hello from sunny and HOT California! We hit 108 degrees yesterday! A new record! Thank goodness today is much cooler :)
I recently have had several searches and comments on my 'Stache Bash Invites blog post from January, so I thought that some of you may like to see the rest of the party 'stache fun I created for my daughters 11th birthday. I apologize in advance because this post is a bit long! Hopefully I can remember exactly what went into each creation, its been a few months. If you have a question on anything you see here please, please feel free to ask and I will do my best to remember. I will add links at the bottom of the post for some of the items I used.


 These are the cupcake toppers I created. The adorable girl image is a digi stamp from Saturated Canary, her name is Starla. The cute mustaches are also digi stamps from Angie Delarie. When creating Starla I let my daughter color her hair and clothes on the computer using the Paint program and then printed them out. I then finished coloring her with my Copic markers and added some Stickles Glitter Glue to her hair. The mustaches came pre-colored so all I had to do was print them out and add a bit of Stickles Glitter Glue. I used Spellbinders Nestabilities Big Scalloped Circles and my Cuttlebug to cut out and emboss the edges of each cupcake topper. I also misted each one with a fine glitter mist. I then used my hot glue gun to glue each topper to a black coffee stir stick that I had pre-cut in half so they weren't to tall.

 I spent too much time creating the cupcake toppers so I decided to just order the cupcakes from my local bakery! Gotta cut corners where you can! :)

I found a mustache sandwich cutter at one of my local stores and decided to use it as a cookie cutter instead. We whipped up some sugar cookie dough and added a TON of pink sprinkles! 


I had searched EVERYWHERE for some mustache streamers and couldn't find any so I decided to make my own. I purchased regular streamers in black and white and then glued a piece of ribbon down the middle of the streamers. I bought a 2 inch mustache punch from Hobby Lobby and punched out a TON of mustaches with pink, white and black card stock. I then used glue dots to adhere the pink mustaches down the center of the streamers. I used the extras mustaches as confetti for decoration on the food table.


What's a 'Stache Bash without mustache straws! I printed out some extra mustache digi stamps by Angie Delarie and used a hole punch to add a hole for the pink straws to fit through and PRESTO! 
Fun, adorable, and girly mustache straws!


 My daughter and I decided it would be fun for her and her girlfriends to have 'stache sticks for them to use in photos and also thought it would be a cool take home gift for her friends. I found some black and clear glittery party straws at Hobby Lobby for the sticks. I tied some fabric ribbon and some pink curling ribbon around the sticks. I then printed out some more girly mustache Angie Delarie digi stamps and cut them out. When each girl arrived we had them pick out a stick and a mustache and then I used the hot glue gun to adhere them. These came in handy for the photo booth!  
Below is a picture after they were assembled.


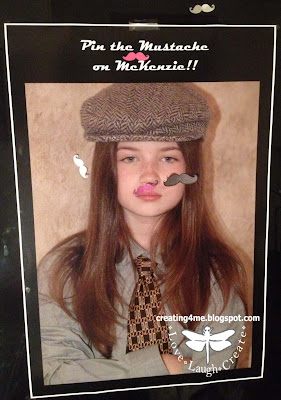
 I thought it would be fun to surprise my daughter with a poster size picture of herself for a game of Pin the Mustache on McKenzie! I had her dress up in her dads clothes and hat so I could take a picture, but didn't tell her why :) 
I ordered the picture, poster size, from Costco. Amazingly inexpensive!
I used my mustache punch to make the mustaches in various colors for the girls to use. They had a blast playing the game. They played several times throughout the night. I'm sure it added a level of fun having a huge print of their friend to use for the game! Lots of laughs were had during the game!


 With a little nudge from Pinterest I decided it would be great fun to have a photo booth area set up for the girls to take some group shots. I lined a wall with black, pink, and white balloons. Hubby helped me string each line of balloons with a needle and heavy duty thread so they would hang straight and somewhat even! It worked well, but we still had to add a little scotch tape in the center where it would start to sag.


 I wanted a frame for the girls to use as a prop in the photo booth. I really wanted a huge, vintage looking, white frame for them to use, but couldn't find one at our local thrift shops. I was running out of time so I purchased a cheap $5 frame from Walmart, took out the glass and added some of the mustache punch outs instead. 

Here are some of the photos taken in our custom photo booth :)
I also provided a bag of props for the girls to use during the photo shoot!


 The giant pink mustache below was found at Party City :)

Thanks for looking! I hope this inspires you to have your own Stache Bash! It was great fun! 
Below are links for some of the items used :) 
Please let me know if you have any questions! 

You can find the link to my blog post about the 'Stache Bash invites shown above here

You can find the Saturated Canary Digital Stamp Starla here

You can find Angie Delarie Digital Stamps here

Rachael Ray Mustache Themed Food Labels for the table here